Intranet Penetration
(This passage contains 0 words)
Download demos? Click here.
Chapters marked by * are optional for FRP to work.
Preface
Sometimes I think of controlling my PC at home while I'm actually in the lab. One way coming into my mind would be SSH. It is simple, open-source and highly reliable. However, SSH isn't possible unless you have the IP address of the target device. Besides, when you and your target device are in different subnets, you can't just communicate with the target without passing through NAT (Network Address Translation) either. I had also thought of purchasing a public network IP so that my device can be accessed from the outside network, but it's just too expensive. So here comes my solution: spend a (relatively) small amount of money to buy (or rent) a device that's accessible in the public network, whose only job is to copy and transfer every request that comes from the outside to my device, and from my device to the outside network.
Such operations are called intranet penetration, which is useful when you want to visit an intranet device such as your PC at home. There are a load of open-source softwares (thanks to the hard work of their developers) available, such as FRP, Ngrok and Chisel. As a start, I chose FRP as my own penetration utility and have successfully made it work after a few days' exploration in this area.
Preparation
Before we start intranet penetration, there are a few things we need to do in advance. For a start, the following minimal conditions should be satisfied if you want to access the intranet device from the outside network:
- 1. An intranet device connected to the Internet (Like your home PC).
- 2. A device with a public IP.
If you don't have a public IP, it's always a good choice to start by renting a server from cloud service providers or simply purchasing one. The latter one could cost much, though. Of course, you don't have to be so well prepared if you just want to practice the idea of intranet penetration.
Next, you can visit the repository of your ideal intranet penetration utility and install the software according to its instructions. For example, you can visit FRP GitHub repository to access the latest FRP software, which is written in GoLang and has been compiled to binary codes on many target platforms. You might have noticed that there are currently two versions of FRP, while most of the blogs and tutorials I came across are based on the first version. So I'll introduce the use of latest V2 version of FRP in my blog.
Configure FRP
Now I assume you have downloaded and extracted FRP to some proper place. Now you can cd that place and use ls -l to see the contents of the package. You might have noticed that there are two executable files named frpc and frps there, and these are softwares that you need to run respectively on the client (FRPClient) and the server (FRPServer). And there are two configuration files here (whose names might end with .toml in version 2 or .ini in version 1). The syntax of running either frpc or frps can be generalized as follows.
<frpc/frps> -c <frpc/frps.toml>
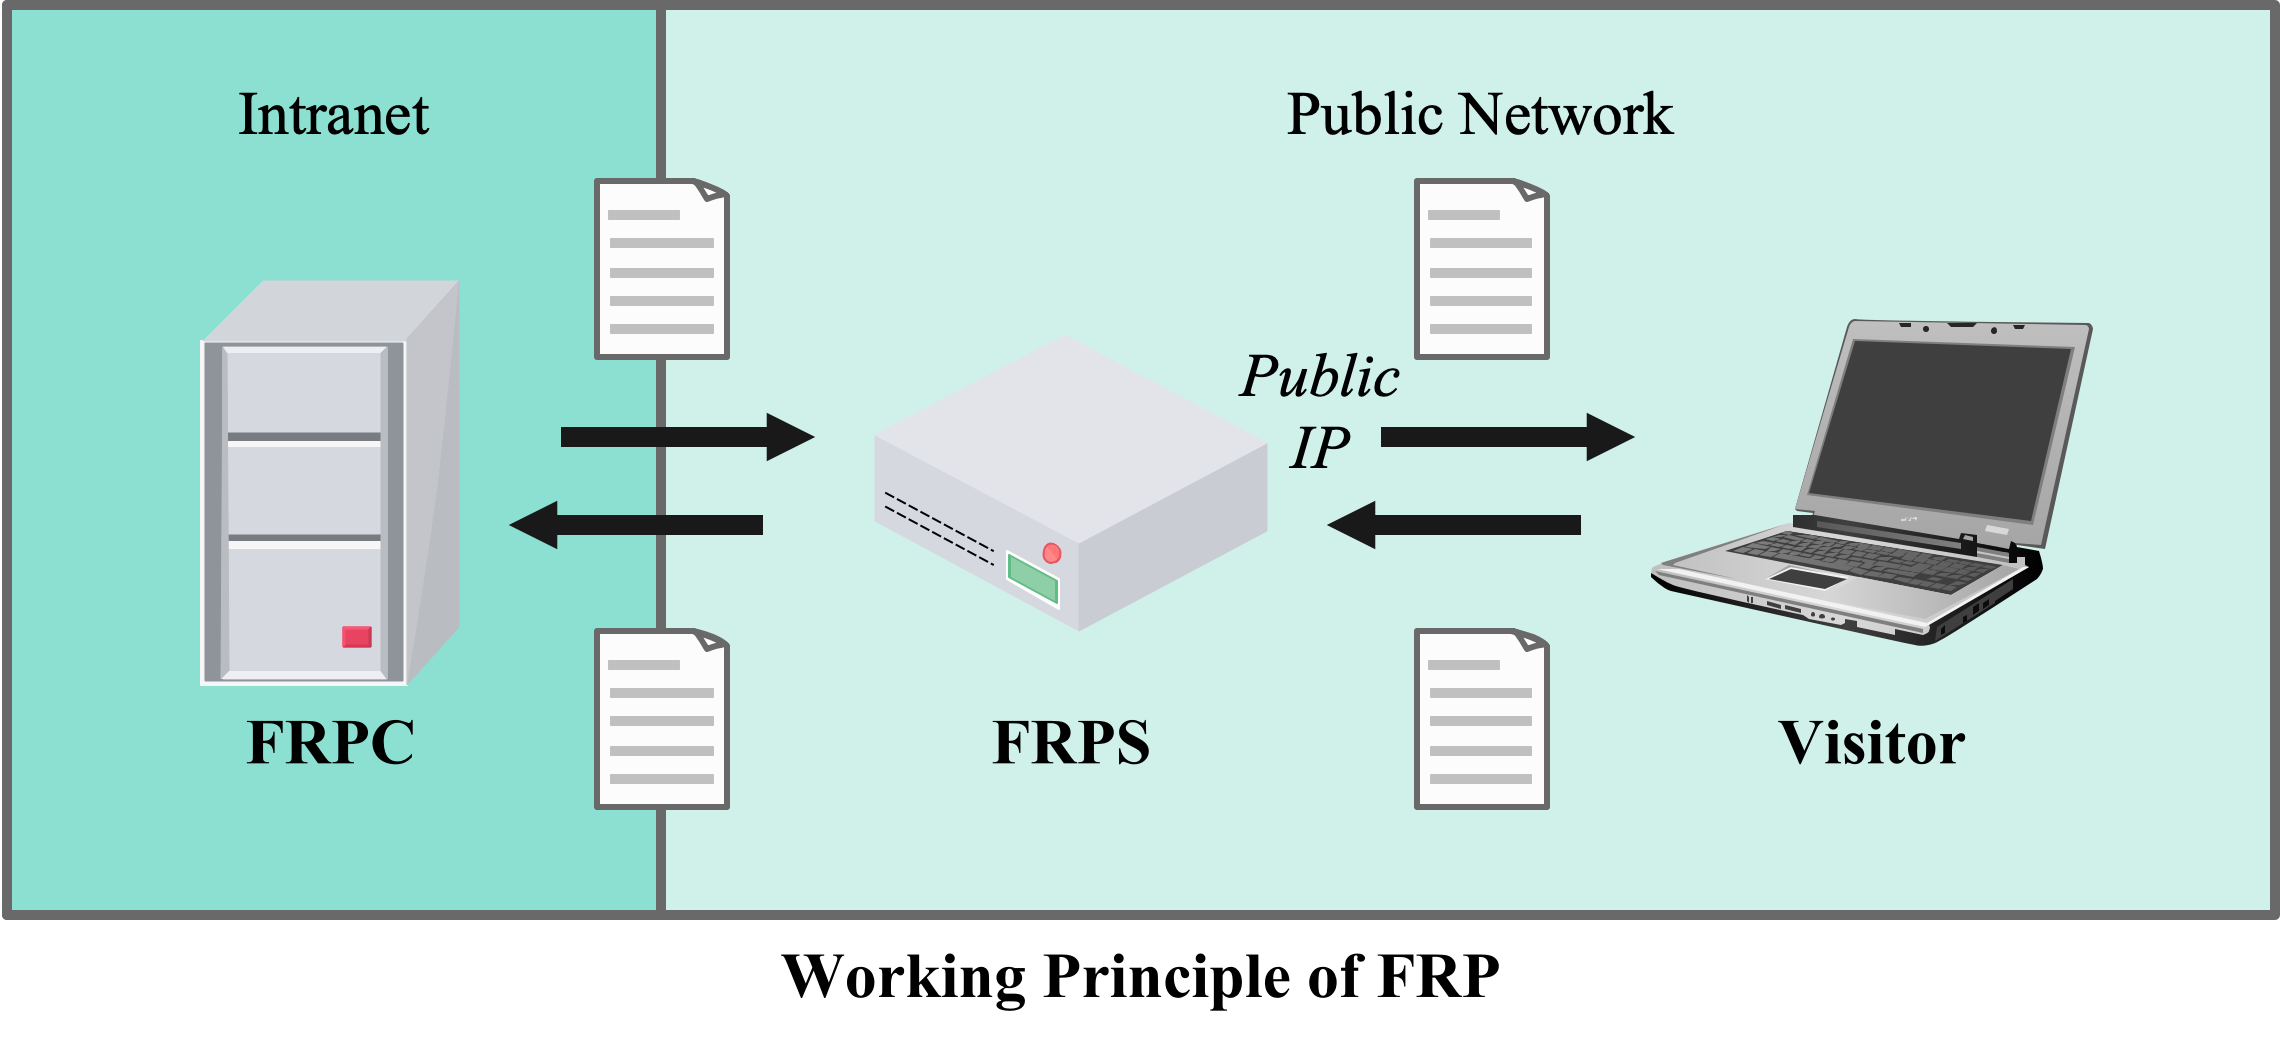
Here -c is simply a flag that indicates a configuration file. This suggests that you can name these files whatever you want, but we will continue with the default names. Next, we need to figure out which device should run as server and which as client. The answer is simple: The device that provide intranet penetration with its public IP should be the server. Once the connection is established, data passed to the server will be transferred to the client, and vise versa (See the following figure).
It's a good practice to create a symbolic link from the frpc or frps executable to some local executable directory such as /usr/bin or /usr/local/bin. For example, use
sudo ln -s /path/to/frpc /usr/local/bin
to create a symbolic link of frpc on your client device. Similar operations can be performed on your server (FRPServer) as well.
Configure FRPS
Now let's move to your server device (which we will refer to as FRPS later). Since the aim of FRPS is to provide FRP service, we have to configure the ports on which it serves and the specific services it provides. Now use one editor that you are familiar with to open the frps.toml file (create one if there isn't one; if you are using FRP V1, the following syntax might be invalid). Conventionally (many people do so), the port FRPS runs on is port 7000 (You can specify any other available port as well). Also we want to specify the address that our server listens to, which is usually 0.0.0.0 for every IPv4 address. So we bind our server software with that port and the address it listens to by
bindPort = 7000
bindAddr = "0.0.0.0"
You can now write these two lines in your frps.toml file. Notice that the default address FRPS listens to is 127.0.0.1, a.k.a. localhost. So make sure you have enabled some other address with bindAddr if you want to access the server from other devices such as your client.
After binding the address and the ports, our server device is now able to transfer requests from one device to the other. However, you might have noticed that there is no explicit restriction on which device could send requests to our server, which means our server now serves client from any IP (i.e. 0.0.0.0). So we have to append a passphrase to the configuration file. FRP supports cleartext passwords which you can set with auth.token (There are other ways to verify the identity of the client, you can refer to auth server config here). Now our configuration file is in the following form:
bindPort = 7000
bindAddr = "0.0.0.0"

[auth]
token = "<your token>"
Dashboard*
By now we have configured the FRPS to function safely. But clearly there's more we can make our FRPS handle. One of the most basic features is the dashboard which performs realtime measurement of the input and output flow. It has been implemented by FRP with a concise web UI interface. To enable the dashboard, we need to configure the address it listens to, the port on which it serves and security settings just like our basic configuration. These can be configured by specifying a webServer table:
[webServer]
addr = "0.0.0.0"
port = 7500
user = <your_user_name>
password = "<your_password>"
You can adjust the ports and address your dashboard listens to on your own (not recommended if you want more flexibility). You will be able to visit the dashboard at http://<frps_ip>:<web_server_port> once you start the service by running
frps -c frps.toml
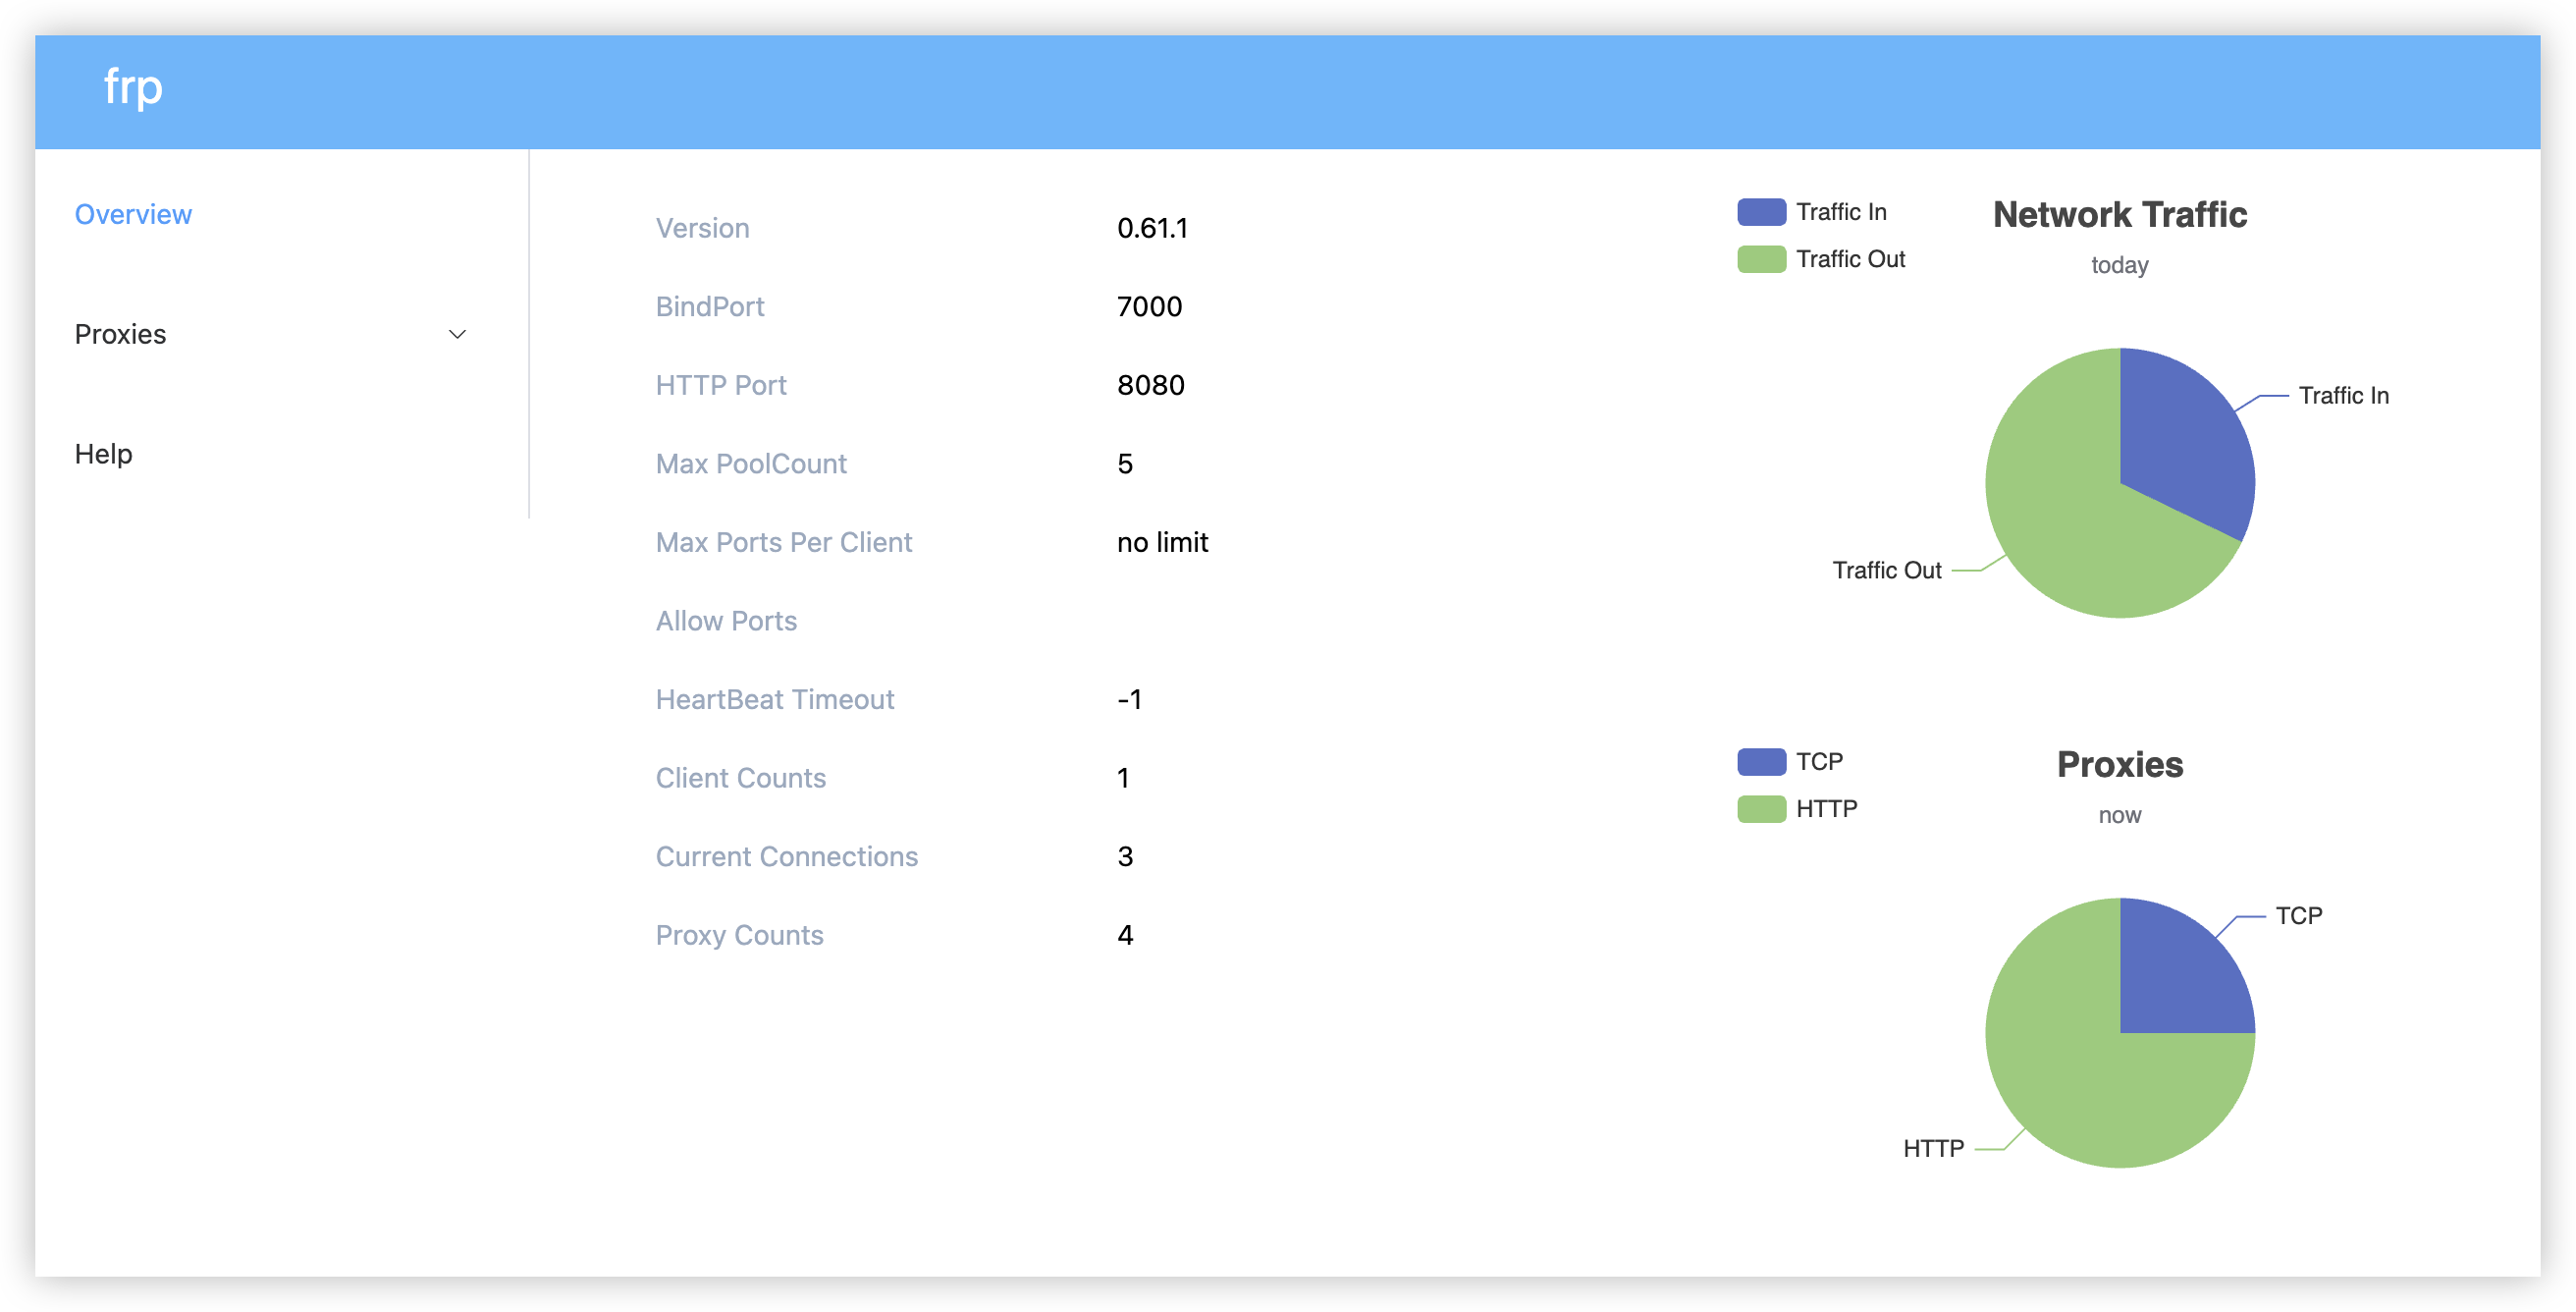
You can replace frps with /path/to/frps if it isn't added to PATH. Once you have started the service, you will see in terminal the outputs of FRPS service indicating success in opening corresponding ports. You can download an example FRPS configuration file here. Here's what a FRP dashboard look like:
Dashboard Domain Name*
This is optional but recommended if you plan to use the dashboard as your daily FRP monitor. If you have purchased a domain name for your server, you can add an A/AAAA DNS record in your configuration panel for any user-defined FRP hostname that directs to your public IP or @. Next, open your web engine configuration file and redirect that FRP server name to port 7500 (or your self-defined dashboard port). I'm using NGINX so here's what I've added to my NGINX configuration file:
server {
    if ($host = frp.frederickyang.com) {
        return 301 https://$host$request_uri;
    }

    listen 80;
    listen [::]:80;
    server_name frp.frederickyang.com;  # replace with your own server name
}

server {
    listen 443;
    listen [::]:443;
    server_name frp.frederickyang.com;  # replace with your own server name
    location / {
        proxy_pass http://127.0.0.1:7500;  # local dashboard port (replace 7500 with your own)
        proxy_redirect off;
        proxy_set_header X-Real-IP $remote_addr;
    }
}
After configuring DNS and the web server, you can run cerbot to generate SSL certificates to secure your FRP dashboard service. Now you can access the dashboard by visiting https://frp.<your_server_name>.
Configure FRPC
Before we set up FRPC on the client side, we have to make sure that FRPS is running and can be accessed via our previously specified ports (such as 7000). You can test the connection by running
telnet <frps_ip/domain> <frps_port>
# e.g. telnet frederickyang.com 7000
If the connection has been successfully established, you will find "Connected to <frps_ip>" or similar strings in the output of telnet. If the connection can't be established (you will know when there is a timeout error), you can refer to my FRPS Troubleshooting section to see the details.
Next, we have to consider what kind of service will our client device provide. For example, you might want your client server in the intranet to provide HTTP web service or SSH service, or both of them, and access these services via your FRPS device. A FRPC supports multiple proxies for providing a large variety of services.
Basically, the configuration of FRPC can be divided into two parts. The first part is where we configure the FRPC software (i.e. frps.toml), and the other is where we adjust relevant software settings (such as web engine NGINX or Apache if you have one).
Configure FRPC Software
Now make sure you have downloaded and extracted FRP files like you did on FRPS. There is a file named frpc.toml in that package, which can be used to configure FRPC software. The configuration can be generally divided into at least two parts. The first part is the most basic settings such as the FRPS address and port, and the token you use to communicate with the FRPS. You can now add the following lines into your frpc.toml.
serverAddr = "<your_frps_ip>"
serverPort = <your_frps_port>
[auth]
token = "<token_specified_in_frps>"
Replace the values with your own. Notice that some people find that it doesn't work when you specify a domain name to the serverAddr. So I gather it is a good practice to just write the public IP of your FRPS. Next, we will configure the services you plan to deploy on your FRPC. I'll introduce two of the most common services: HTTP and SSH in this blog. If you wish to deploy more services, you can refer to the official documentation page of FRP here.
1. Deploy HTTP
This involves creating an HTTP proxy in the frpc.toml. All the proxies are managed by an array of tables named proxies in the TOML file (It's ok if you are not familiar with these concepts in TOML), and each of the HTTP proxy should involve at least the following key-value pairs:
[[proxies]]  # specify an array of tables called proxies
name = "<specify_an_alias_for_this_proxy>"
type = "http"
localIP = "127.0.0.1"  # i.e. "localhost"
localPort = 80  # specify your own
customDomains = [ "<your_first_domain>", ["<your_second_domain>", ...] ]
You can configure more than one HTTP proxies if you need. This can be useful when you want your FRPC to serve on multiple ports. As for customDomains, you can use real domains if you have. You can also specify a self-defined domain as long as it only appears once. Now your client-side HTTP should have been prepared to work. See the NGINX section to get well-prepared for starting a full HTTP service.
2. Deploy SSH
Just like HTTP, we now add an SSH proxy into the proxies array. The type of SSH proxy should be TCP, and the local port is usually 22 (Just choose your own SSH port):
[[proxies]]
name = "ssh"
type = "tcp"
localIP = "127.0.0.1"
localPort = 22
remotePort = 6000  # specify your own
The remotePort key specifies the port through which on the FRPS you will access the SSH service. For example, if it is set to 6000, you will need to run the following command to establish an SSH connection to your FRPC through FRPS:
ssh <username>@<frps_ip> -p <6000> # replace 6000 with your own
It is not recommended to set the remote port to 22 since there will be a conflict between SSH on FRPS and FRPC.
Configure NGINX*
This section is optional if you have already deployed your web service. Other web engines such as Apache can be configured in the same way. We want to make sure that our web service is listening to the port we have specified in HTTP proxy in frpc.toml. For example, if we have specified localPort to be 80, the following configuration can be used in NGINX:
server {
    listen 80;
    listen [::]:80;
    root <your_html_root>;
    index index.html index.htm index.nginx-debian.html;
    server_name localhost;
    location / {
            try_files $uri $uri/ =404;
    }
}
This configuration enables FRPC to listen to http://localhost:80, which is configured to be the service entry in frpc.toml. By configuring NGINX, it will listen to port 80 at localhost, which will receive data from FRPC process that come from the FRPS, port 7000 (as specified before).
Run FRPC
After all the configurations, FRPC can be executed by running the following command:
frpc -c ./frpc.toml
If your configurations are correct, FRPC should be running properly now. You can download an example FRPC configuration file here. Now try using a browser to access your FRPS public IP or using SSH to visit your FRPC (Remember to specify the right port when running the SSH command).
Troubleshooting
The troubleshooting processes on both sever and client sides follow the same approach, and we will focus on the server-side one. Here's a brief checklist for your reference:
- 1. Check your FRPS configuration (especially bindAddr settings).
- 2. Check your security group (if you are renting a server from cloud service providers).
- 3. Check your local firewall configurations (allow the ports your specified).
- 4. Check your network connection (dumb but can be useful).
You might have encountered the following situation where you have configured and successfully started FRPS process but can't visit the port you specified for your dashboard or FRPS service (such as 7500 for dashboard and 7000 for FRPS). You might have tested these ports with telnet only to receive a timeout error.
Such phenomenon can be associated with various reasons. For example, you need to check if you have bound your server with the correct address that it should listen to. As I have explained earlier, you need to explicitly specify the address "0.0.0.0" using bindAddr in your frps.toml, or your server will only listen to its localhost.
Another possible cause of such problems would be firewall misconfigurations. If you are renting a server from cloud service providers such as Tencent or Alibaba, make sure you have allowed these ports in your security group. Next, depending on the firewall softwares your server is equipped with (such as UFW for Ubuntu and FirewallD for CentOS), you have to allow these ports as well. For example, if you are using FirewallD, you can add these ports into your white list permanently:
sudo systemctl status firewalld  # make sure FirewallD is running
sudo firewall-cmd --zone=public --add-port=<dashboard_port>/tcp --permanent
sudo firewall-cmd --zone=public --add-port=<frps_port>/tcp --permanent
sudo firewall-cmd --reload  # reload the service
Replace the ports with your own. These commands will allow both IPv4 and IPv6 data flow into your specified ports permanently. If you are using UFW or other firewalls, you can always perform the same operations.